
Exp +31%
Loot +31%


Top 5 Exp Today
365,484,341
346,767,904
339,712,013
116,142,008
90,596,338
72,245,676
13,510,785
1,828,880
1,536,710
1,470,375
1,010,915,615
962,523,778
957,194,050
375,311,423
344,626,359
352,478,080
96,530,233
12,332,775
12,258,525
7,180,889
Top 5 Players
Top 5 Killers
29
24
21
14
13
Characters For Sale
Level: 230
Level: 255
Level: 318
Level: 462
Level: 202
Supply Box
(November)

 Key BunchGuaranteed
 Box Magic ShopGuaranteed
 Tiguer Trophy10.0% Chance
 Crocodile Trophy10.0% Chance
 Blood Herb10.0% Chance
 Backpack10.0% Chance
 Super UH10.0% Chance
 Super SD10.0% Chance
 Crystal Coin10.0% Chance
 Platinum Coin10.0% Chance
 Auto Loot Time10.0% Chance
 Soul Rune10.0% Chance
 Special ItemMonthly Bonus
 Brotherhood Outfit TokenEvery 8 boxesKey BunchGuaranteedBox Magic ShopGuaranteedTiguer Trophy10.0% ChanceCrocodile Trophy10.0% ChanceBlood Herb10.0% ChanceBackpack10.0% ChanceSuper UH10.0% ChanceSuper SD10.0% ChanceCrystal Coin10.0% ChancePlatinum Coin10.0% ChanceAuto Loot Time10.0% ChanceSoul Rune10.0% ChanceSpecial ItemMonthly BonusBrotherhood Outfit TokenEvery 8 boxes
Your complete client guide
From your first click to setting up a hunt. Learn the buttons, arrange your screen and use every tool with real photos and simple steps.
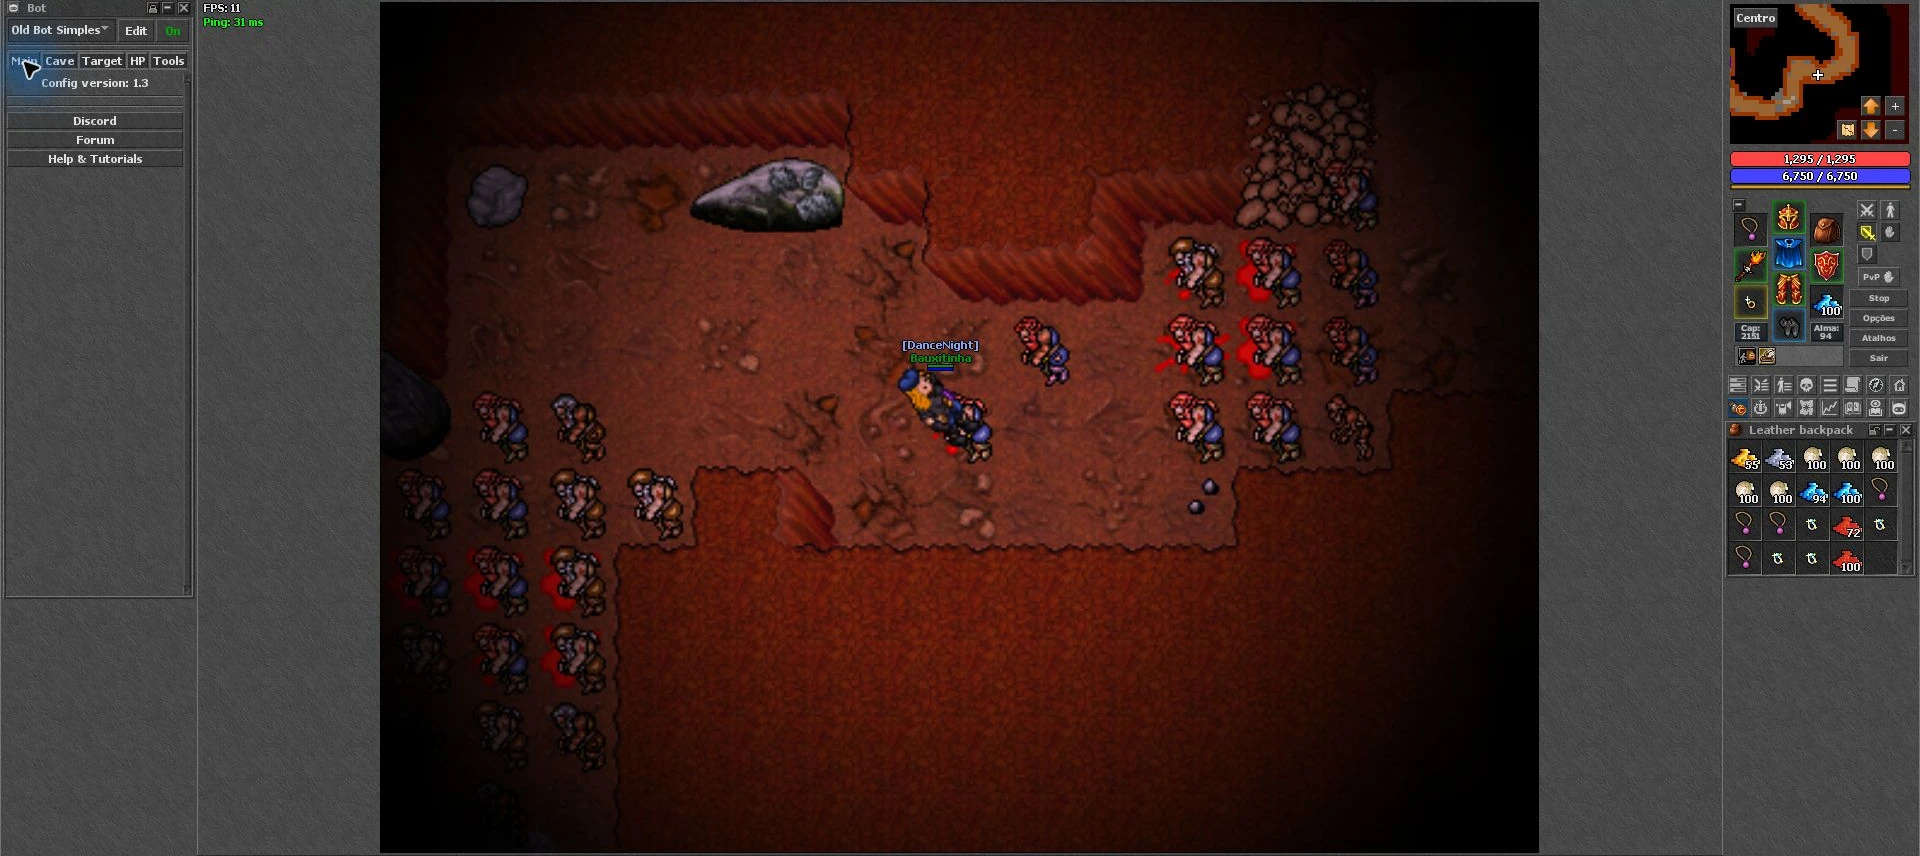
Choose an icon or search for a question. Open a topic for step-by-step instructions. Tap photos to enlarge; English labels help you recognise settings even when the screen language changes.
Which button is this?
In the photo, read left to right: 1–8 on the first row and 9–16 on the second. Click a button below to open its explanation.

 SkillsLevel, experience and skills.
 BattleNearby creatures and targets.
 VIP ListOnline/offline friends.
 FragsPvP counters.
 HotkeysKeys for spells and items.
 Adventure JournalMissions and progress.
 TravelSoul destinations and access.
 My houseHouse, rent and permissions.
 Trade OnlineBank, shop, market and Bazaar.
 AutoLootServer loot list.
 Rewards HubActivities and daily rewards.
 Hunt AtlasHunt search and discoveries.
 Hunting AnalyzerSession measurements.
 BestiaryCreature and kill records.
 EncyclopediaItems, drops and buyers.
 BotHealing, attacks, looting and routes.
In Default layout, buttons may appear at the top. On mobile, some tools are in the “...” menu. Options and Hotkeys also appear beside equipment in Retro.
No matching topic. Try “healing”, “CaveBot”, “Options” or “hotkeys”.
Start here
Find your way around the screen before setting up your hunts.
Meet the game screenEach area has a purpose: game map in the centre, character on the right, chat at the bottom and side panels.
Step by step
- Locate your character in the centre of the map. Names, health bars and effects appear here.
- On the right, find the minimap, red health bar, blue mana bar, equipment and buttons.
- At the bottom, use the chat tabs. Server Log shows action results and game messages.
- Open the panels you need. The X on a side window usually closes that panel; its icon opens it again.
The photos show the Retro layout. Default layout and mobile place buttons differently; look for the function name.
Back to search and chapters ↑Your first setupA short checklist for a comfortable first session.
Step by step
- Open Options → Game → Change language and choose your language.
- In Interface, keep names, health and mana visible. Adjust side panels and the container destination to your screen.
- Open Hotkeys, assign a healing spell and mana item, and check each use mode.
- Open the Atlas to find a hunt and the Journal to choose a mission. Prepare supplies before leaving.
- If using the bot, set up and test healing and mana first. Then configure targets and a short route.
Walking, chatting and mouse controlsThe control mode changes how you interact with creatures and objects.
Step by step
- Use the arrow keys to walk. For WASD, enable Enable WSAD walking in Options → Game.
- With WASD, check whether chat is active before typing. The client switches chat focus to separate typing and movement.
- Right-click an item or creature to see available actions. Classic control changes mouse interaction.
- Open backpacks and drag items to organise them. Read names and quantities before moving stacks or using items.
Understand the controls
- Enter
- Send a chat message; in WASD mode it also participates in toggling chat.
- Ctrl+O
- Open the channel list.
- Ctrl+E
- Close the current chat tab when allowed.
Equipment, health, mana and conditionsUnderstand the information you use throughout a hunt.
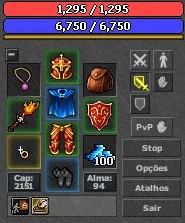
Step by step
- Drag equipment to the matching slot: head, armour, legs, boots, hands, ring, necklace, ammunition and backpack.
- The red bar shows HP and the blue bar shows MP. Cap is free carrying capacity; Soul is used by systems such as travel.
- Hover over the small symbols below equipment to read conditions such as poison, haste, mana shield and logout blocking.
- Combat controls select fight stance and chasing. Check these modes when the character will not follow, or keeps following, a target.
Stop interrupts manual movement/combat actions, but enabled automation may start another action. Use the bot controls to stop the bot.
Back to search and chapters ↑Minimap, floors and markersThe minimap helps you recognise explored paths and the floor currently displayed.
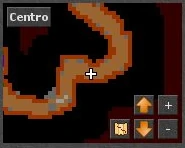
Step by step
- Use + and − to zoom. Floor arrows display other levels on the minimap; they do not move your character between floors.
- Use Centre to return to your position after moving the map view elsewhere.
- Check the minimap context menu for marker options. Use names that help identify entrances and stairs.
- To locate creatures and navigate hunting areas, open Hunt Atlas, which provides search and floor selection.
Options, tab by tab
Open Options next to equipment. Labels may be translated according to the client language.
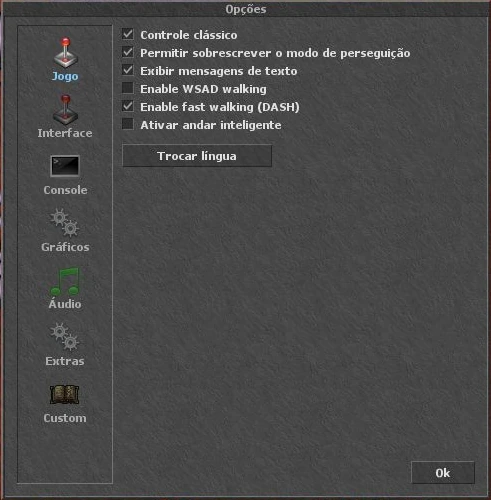
GameMovement, mouse control, messages and language.
Step by step
- Open Options and choose Game in the left column.
- Choose your control and walking modes. Test movement before entering a difficult area.
- Use Change language to change the overall client language. Tibinha panels follow this preference.
Understand the controls
- Classic control
- Switches classic mouse behaviour.
- Allow auto chase override
- Allows manual walking to override automatic chasing.
- Display text messages
- Controls game text display.
- Enable WSAD walking
- Allows walking with W, A, S and D; watch chat mode.
- DASH
- Attempts the next step without waiting for the previous confirmation. Test with your connection.
- Smart walking
- Combines direction keys to make diagonal steps easier.
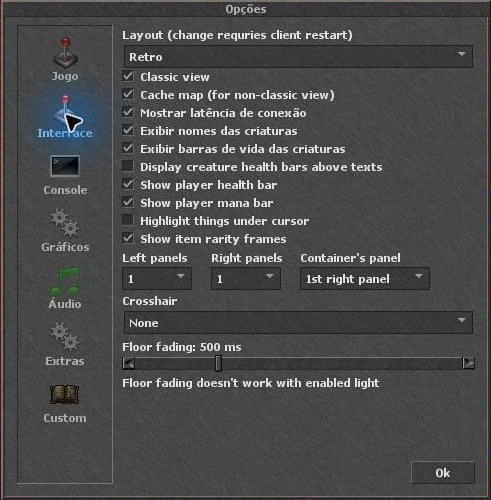
Interface: organise your screenSide panels, containers, bars, names and item display.
Step by step
- Open Options → Interface and choose how many panels you want on each side.
- In Container’s panel, choose where new backpacks open. Check this setting if a container appears somewhere unexpected.
- Enable the information you want to see: names, health, mana, ping and cursor highlighting.
- Layout changes the visual arrangement, such as Retro or Default. The window indicates when reopening the client is required.
Understand the controls
- Classic view / Cache map
- Adjust map presentation and caching; Cache map applies to non-classic view.
- Show connection ping
- Shows response time in milliseconds.
- Names / health / mana
- Control creature/player names and bars.
- Show item rarity frames
- Shows rarity frames on valuable container items.
- Crosshair
- Selects crosshair: None, Default or Full.
- Floor fading
- Visual floor transition duration. It has limitations when lighting is enabled.
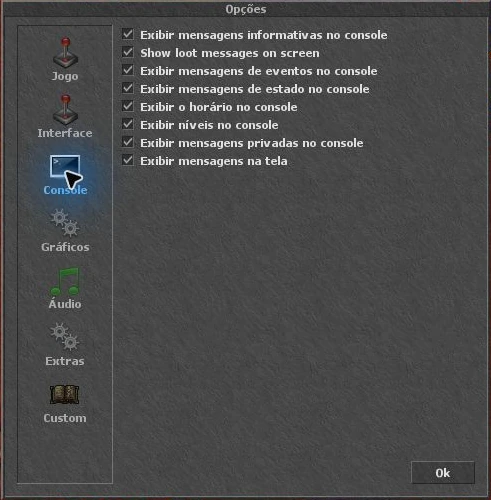
Console: organise messagesChoose what appears in chat and over the map.
Step by step
- Open Options → Console. Keep information and status messages visible to understand server responses.
- Enable timestamps and levels to identify when messages were sent and the speaker’s level.
- If text covers your hunt, adjust on-screen loot and private messages while keeping console records as preferred.
Understand the controls
- Info / Event / Status
- Information, event and status messages in the console.
- Show loot messages on screen
- Displays loot text on the game screen.
- Timestamps / Levels
- Add time and level to chat.
- Private messages
- Control private messages in the console and on screen.
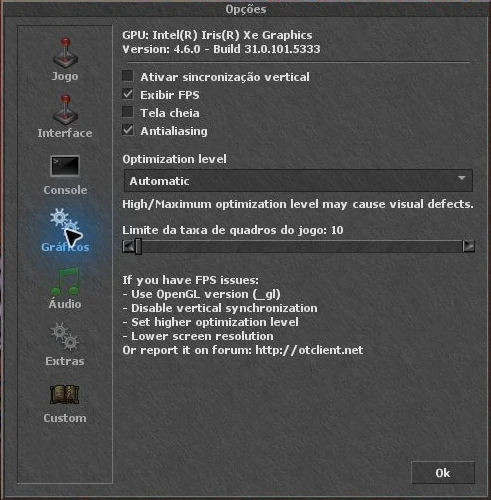
Graphics: FPS, fullscreen and performanceUnderstand each setting before choosing a configuration for your computer.
Step by step
- Open Options → Graphics and enable Show frame rate to monitor FPS.
- Check the frame limit: a low limit keeps FPS low even if the computer could render more frames.
- Test VSync and Optimization level one setting at a time. High and Maximum may cause visual defects.
- Use Fullscreen or Ctrl+Shift+F to toggle fullscreen. Compare the OpenGL and DirectX builds available in Downloads if graphics fail.
Understand the controls
- VSync
- Synchronises frames with the display and may cap FPS to its refresh rate.
- Antialiasing
- Visual smoothing. Compare on/off to judge appearance and performance.
- Optimization level
- Automatic, None, Low, Medium, High and Maximum.
- Game framerate limit
- Frames-per-second cap; this is separate from connection ping.
Audio: music and alertsBot volume is separate from music volume.
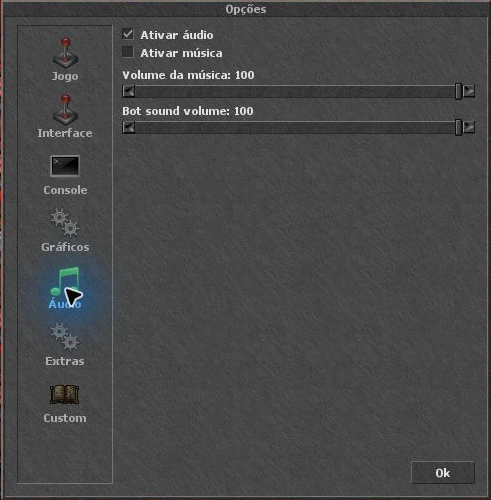
Step by step
- Open Options → Audio and check Enable audio.
- Enable music if desired and adjust Music volume.
- Adjust Bot sound volume to hear bot alerts. The alert condition must also be enabled in the bot.
If you hear nothing, also check Tibinha volume in Windows and the selected output device.
Back to search and chapters ↑Custom: profiles and nine action barsCustomise indicators and shortcuts without filling the game area.
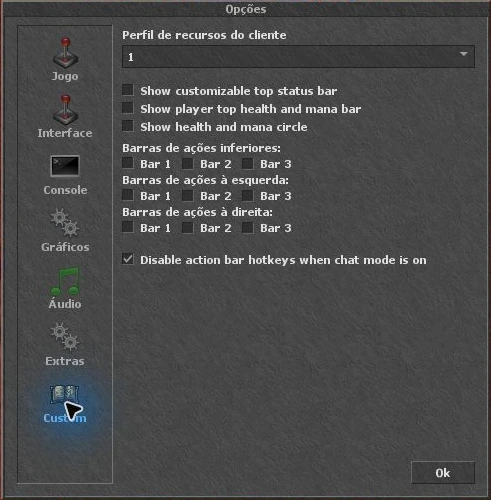
Step by step
- Open Options → Custom. Client feature profiles have slots 1–10; choose a profile before arranging shortcuts.
- Enable the bottom, left or right action bars you want. There are three in each region.
- Choose the custom top status bar, top HP/MP bars and health/mana circle as desired.
- Disable action bar hotkeys when chat mode is on prevents those shortcuts from firing while chat is active.
Feature profile, Hotkeys configuration and Bot configuration are different selectors. Check all three when switching setups.
Back to search and chapters ↑Extras: what do these names mean?This tab contains client diagnostics and behaviour options.
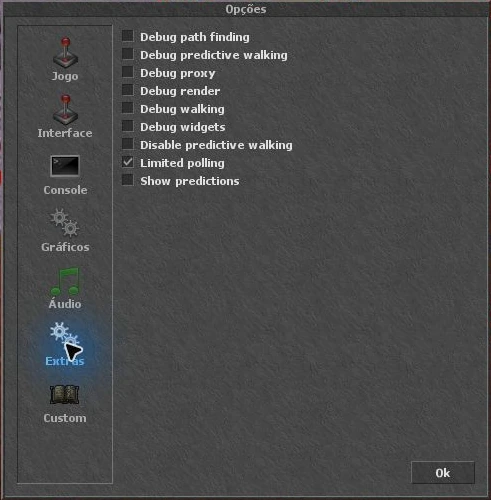
Step by step
- Open Options → Extras to identify the options shown by your version.
- Debug path finding, Debug walking, Debug render and Debug widgets display diagnostic information for investigating problems.
- Disable predictive walking, Limited polling and Show predictions also affect client behaviour/diagnostics. Record previous values when investigating an issue so you can compare.
Hotkeys, bars and chat
Build controls that suit your vocation.
Create a spell hotkeyExample: a key that casts your healing spell.
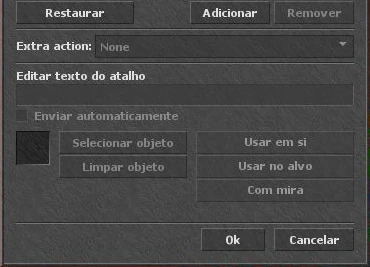
Step by step
- Open Hotkeys with its button or Ctrl+K. Check which of the five configurations is selected.
- Select a key in the list or use Add to register another combination.
- Enter the spell words in Edit hotkey text. Use a spell available to your vocation and level.
- Enable Send automatically to send the spell directly instead of only filling the chat input.
- Confirm with OK and test. If only text appears in chat, check Send automatically.
Create a potion or rune hotkeyThe key needs to know which item to use and who to use it on.
Step by step
- Open Ctrl+K and select the desired key.
- Click Select object and select the item in game. Check that its icon matches the intended potion or rune.
- Choose Use on yourself for self healing/mana, Use on target for the combat target, or With crosshairs to choose a target with the cursor.
- Confirm with OK, keep supplies accessible and test before hunting.
Understand the controls
- Use on yourself
- Uses on your character.
- Use on target
- Uses on the combat target as supported by the item.
- With crosshairs
- Opens a cursor for manual target selection.
- Clear object / Reset All
- Clears the selected object / resets hotkeys. Check before discarding your setup.
Build an action barKeep spells and items visible and bind keys to actions.
Step by step
- Enable the desired bar in Options → Custom.
- Use a slot’s context menu to configure text, a spell or an item. Dragging an item to a slot also helps set it up.
- Check the action mode: use, use on self, use on target or choose with crosshairs, according to the item.
- Assign the key and test. If editing is locked, check the bar’s own menu.
Avoid assigning the same combination to different actions. A key already used by the client may open another window along with your action.
Back to search and chapters ↑Channels, private messages and logsUse separate tabs to follow conversations and important game responses.
Step by step
- Press Ctrl+O to browse channels and open those you want to follow.
- Select the appropriate tab before sending a message. Talk to NPCs in the channel/context they request.
- For private messages, use the player’s message option. Check the recipient before sending.
- If an action fails, check Server Log. It often explains missing items, money, access, space or an incorrect position.
All Tibinha panels
Use the icon index above to locate each window.
Skills: level and abilitiesTrack experience, combat skills and additional skills reported by the server.
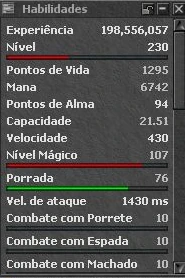
Step by step
- Click the lines icon, first in the pictured toolbar, to open Skills.
- Read values and progress bars. Scroll the panel to reach skills further down.
- Check Mining among Tibinha skills. Reaching the skill cap does not prevent further extraction.
Battle: creature listSee nearby creatures and select targets without finding their sprite on the map.
Step by step
- Open Battle with the sword-list icon or Ctrl+B.
- Use the window’s available filters and sorting controls to organise the list.
- Choose a target and check its name and health. Chase mode determines whether your character follows it.
VIP List: online friendsA character contact list, separate from Premium Account.
Step by step
- Open VIP List with the person-and-lines icon or Ctrl+P.
- Use the list menu to add a character by name.
- Check online/offline status and use the contact menu for available actions such as private messages.
Frags: check your PvP statusThe skull icon opens available unjustified-kill points and counters for your character.
Step by step
- Click the toolbar skull to open Frags.
- Read the counters and limits shown by the game before engaging in player combat.
- Read the server rules to understand PvP consequences and penalties.
Adventure Journal: quests and progressFind missions, treasures and objectives and check your character’s progress.
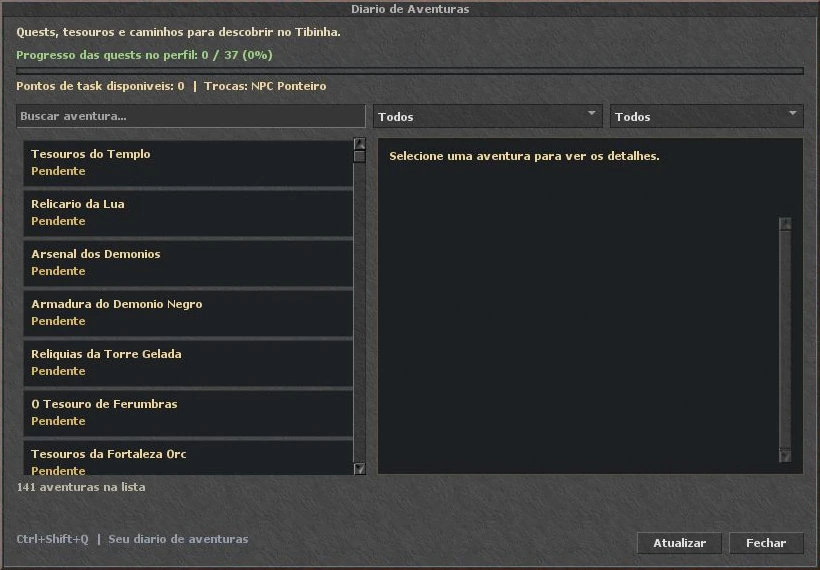
Step by step
- Open the scroll icon, Adventure Journal. The displayed shortcut is Ctrl+Shift+Q.
- Search for an adventure by name and use filters to narrow the list.
- Click a mission to read its description, objectives and available progress. Use Refresh to query its state again.
- To compare rewards and locate quest starting points, also consult the website quest guide.
Travel: return to discovered placesPaths of Tibinha shows destinations, access requirements and Soul costs.
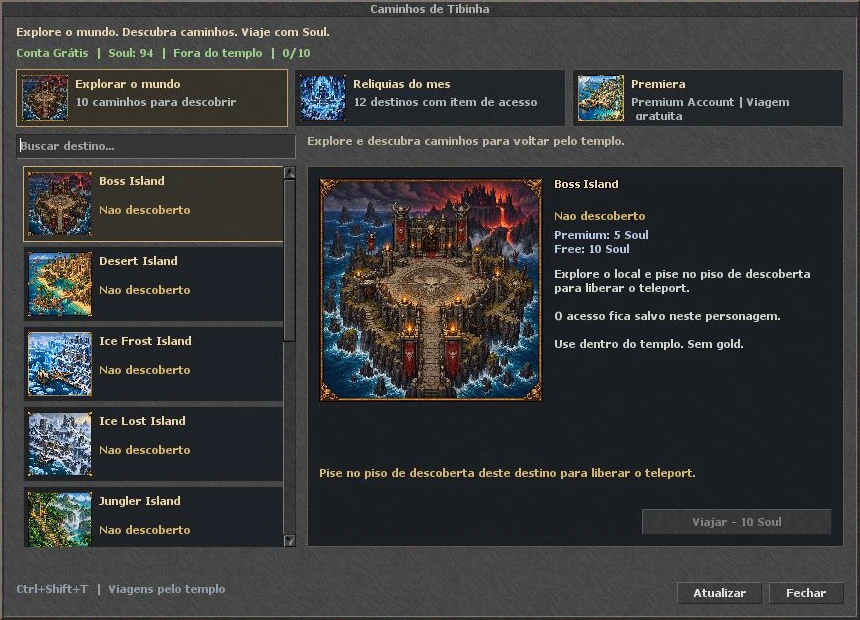
Step by step
- Open the compass icon or Ctrl+Shift+T. Choose Explore the world, Monthly relics or Premiera.
- For discoveries, explore the destination and step on its discovery tile. Access is saved for that character.
- For item destinations, carry the required item. Read the requirement and cost shown on the right.
- To travel, enter the temple area and have enough Soul. The panel indicates when a destination is ready.
Travel in this panel does not charge gold. Soul cost and Premium/item requirements depend on the destination and are shown in the window.
Back to search and chapters ↑Hunt Atlas: find a creatureA visual hunting search with a map, floors and recommended areas.
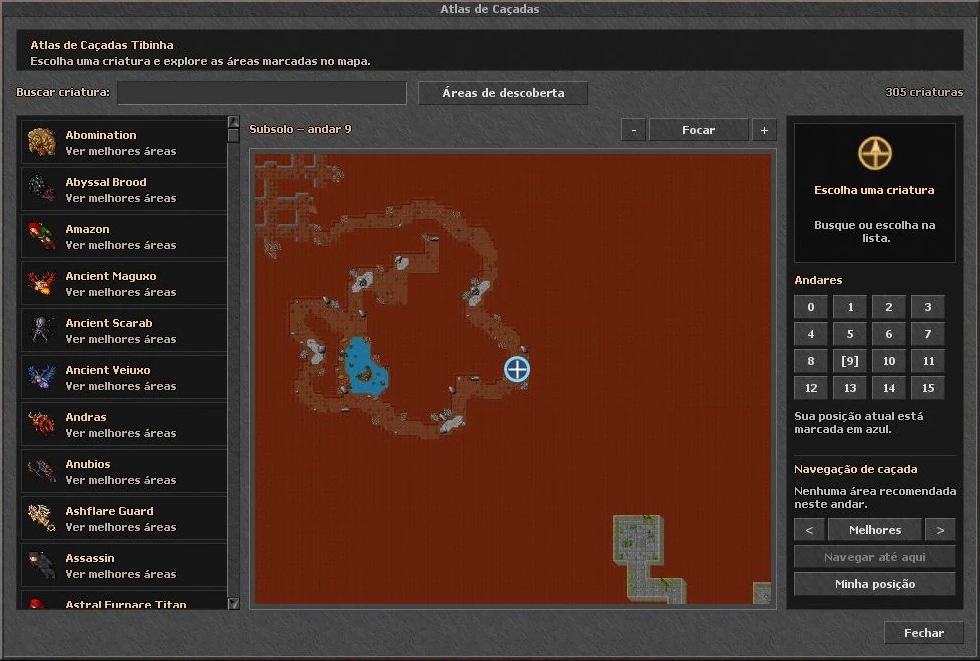
Step by step
- Click the Atlas map-star icon. Type a creature name in the search box.
- Select the creature and floor. Use navigation controls to switch between recommended areas.
- Adjust zoom, use Focus Hunt to centre the hunt and My Position to find yourself on the map.
- Navigate Here starts guidance toward the selected point. Follow the indicated route and floor changes.
Atlas guidance helps you locate places. It does not unlock quest access, provide keys or configure CaveBot routes.
Back to search and chapters ↑Discover Areas: outfit journeysExplore map locations and complete their hunting objectives to progress through journeys.
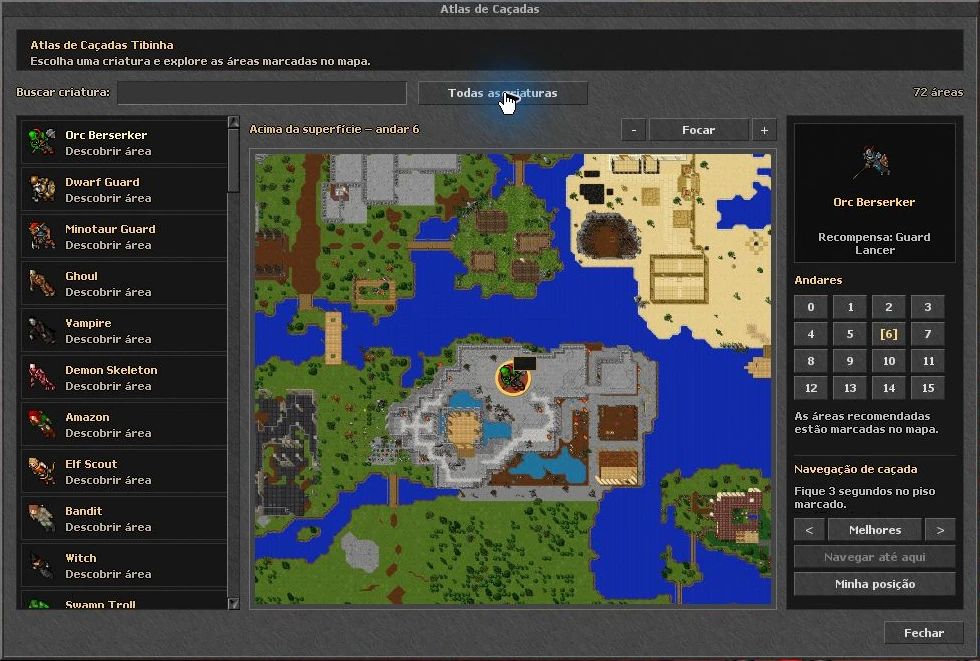
Step by step
- Open Hunt Atlas and click Discover Areas.
- Select an area. Check the floor, map marker and outfit reward.
- Reach the marked tile and stay for three seconds to register discovery.
- Then hunt the required creatures in the indicated area and follow the counter. Hunting the same creature elsewhere does not guarantee progress.
- Complete every area in the journey to unlock its outfit. Consult the guide for all four journeys.
Bestiary: your kill recordsBrowse creatures by family and track what your character has fought.
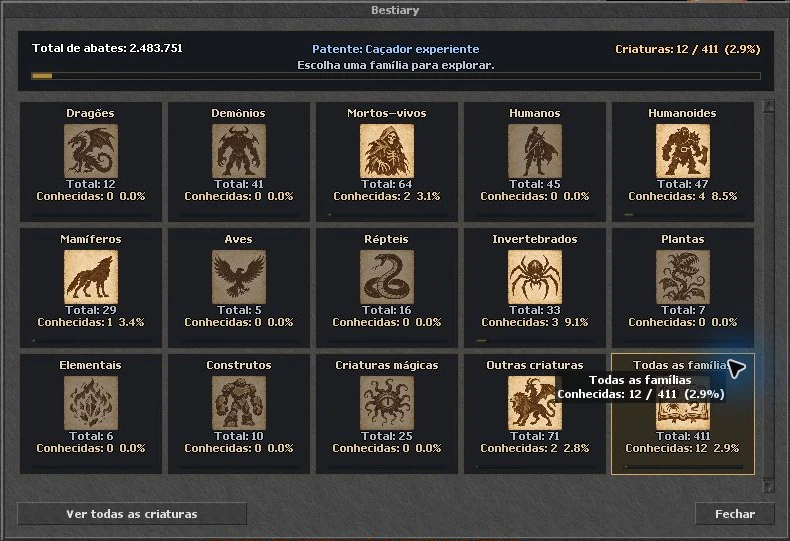
Step by step
- Open the Bestiary double-book icon.
- Choose a family or View all creatures to browse the complete list.
- Select a creature to read its data and recorded progress.
- Use Bestiary for general kills; follow discovery journey objectives in Hunt Atlas.
Encyclopedia: items, drops and buyersLook up equipment and loot without leaving the client.
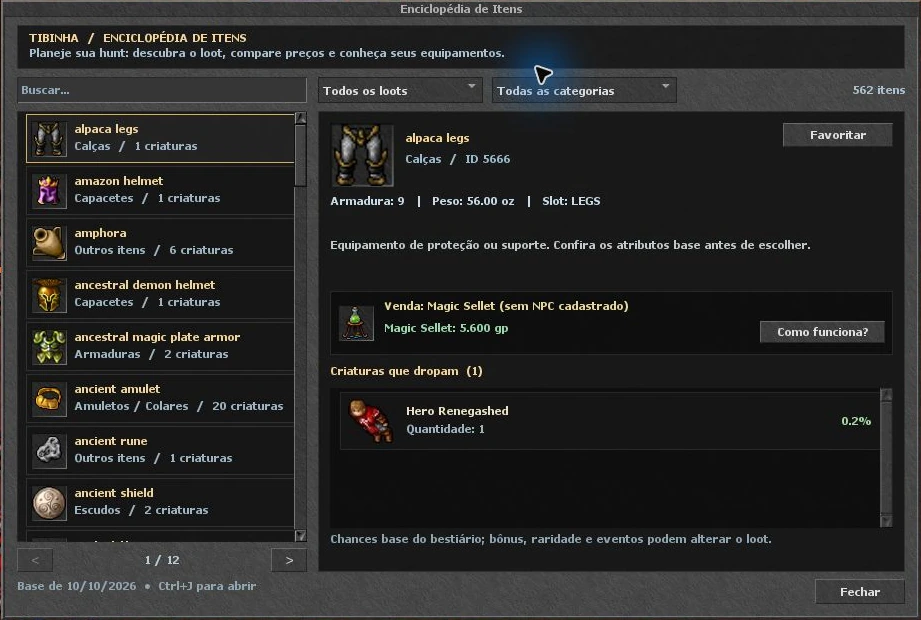
Step by step
- Open the medal / Encyclopedia icon or Ctrl+J.
- Search for an item and use loot/category filters.
- Select an item to read its stats, buyers and creatures that may drop it.
- Use Favourite to save interesting items. Use How does it work? to read about the listed buyer.
Displayed chances refer to the loot base. Bonuses, rarity and events may change results; a chance does not guarantee a drop.
Back to search and chapters ↑Rewards Hub: what to do todayCompare repeatable activities, rewards and availability.
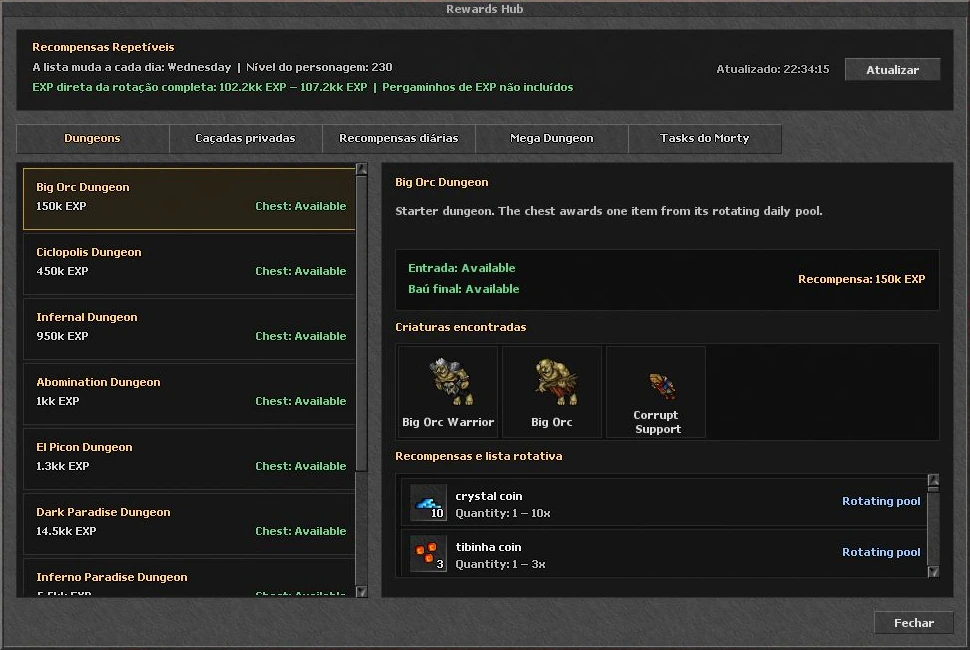
Step by step
- Open the flags icon, Rewards Hub.
- Choose Dungeons, Private hunts, Daily rewards, Mega Dungeon or Morty tasks.
- Click an activity to see creatures, rewards and entry/chest status.
- Check when the list was refreshed and use Refresh if needed. The rotation can change by day.
Items in a rotating pool are possible rewards. Read the description to distinguish choices, random draws and guaranteed rewards.
Back to search and chapters ↑Bank, donations, market and BazaarOne button opens the character’s economy menu.
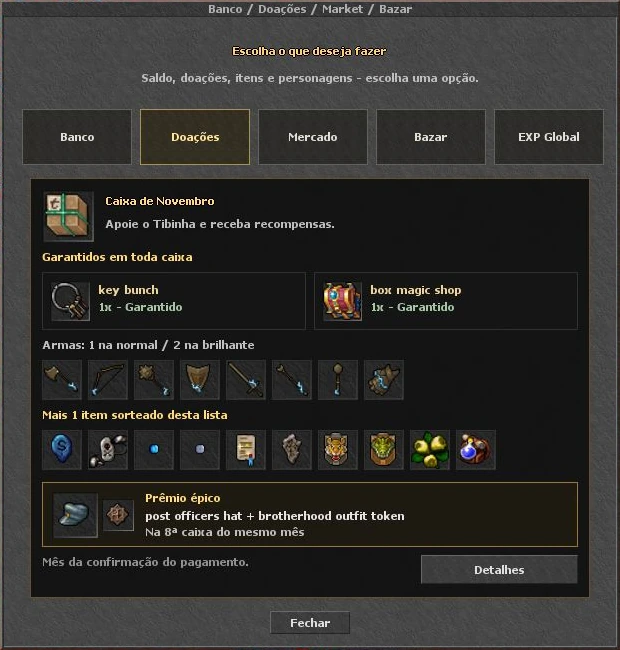
Step by step
- Click the coins / Trade Online icon to open the menu.
- Choose Bank for balance and banking actions, Market for item offers, Bazaar for characters, or Donations for shop information and links.
- Read the window’s conditions before confirming an operation. The game reports position, balance and access requirements.
Market: buy, sell and receiveTabs separate public offers, listing creation, your offers and banking.
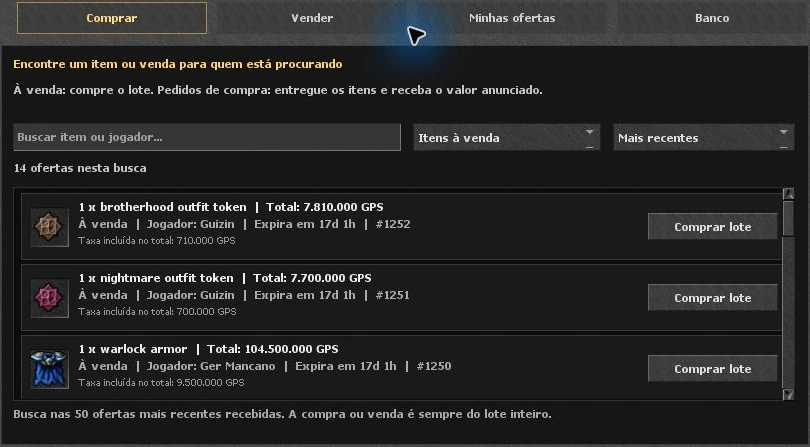
Step by step
- Open Trade Online → Market and search by item or player. Check the filter for sale listings or buy requests.
- Read the item, quantity, currency, total price and fee. The window states when trading applies to the entire lot.
- To list an offer, use Sell and review the details before confirming. Track listings and available actions in My offers.
- After trading, check pending-delivery messages and delivery instructions. Read Server Log for the operation result.
The photo illustrates the interface: offers, prices and availability change. The panel reports which operations require the Paradise depot.
Back to search and chapters ↑AutoLoot: choose what to collectServer AutoLoot has its own activation and item list.
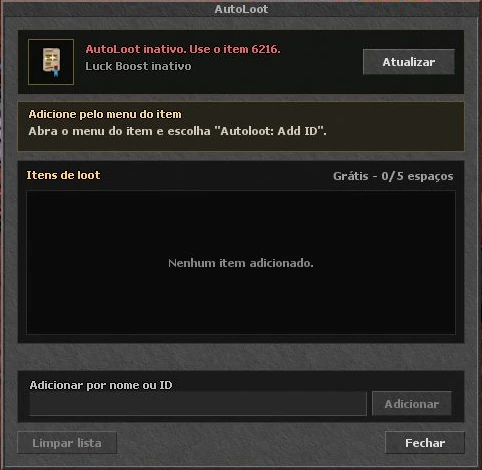
Step by step
- Open the backpack / AutoLoot icon. Check activation and Lucky Loot Boost at the top.
- If inactive, follow the panel’s activation-item instructions. Listing items alone does not activate the feature.
- Add an item by name/ID in the panel or through the item menu’s Autoloot: Add ID option.
- Check available slots for your account and remove unwanted items. Refresh the window to check its state.
TargetBot looting is a separate setup. The bot loot list and server AutoLoot list are different.
Back to search and chapters ↑My house: rent, access and tradingCheck your house and available management options.
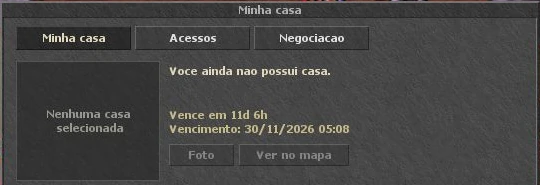
Step by step
- Open the house icon or Ctrl+Shift+H.
- In My house, check property details, due date and photo/map options. The panel indicates if you do not own a house.
- In Access, check guest and permission options available to your character.
- In Trading and Pay rent in advance, read the amounts and confirmation before completing changes.
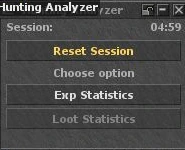
Hunting Analyzer: compare huntsTrack a hunting session and its statistics.
Step by step
- Open the graph / Hunting Analyzer icon.
- Choose Exp Statistics for experience data. Check Loot Statistics when available for the session.
- Use sessions of similar duration to compare hunts. Reset Session clears that session’s measurement.
vBot may also show its own Bot Analyzer. The two panels have separate measurements and sessions.
Back to search and chapters ↑Integrated bot: from setup to hunting
Set up in stages: healing and mana → targets → loot → route → supplies.
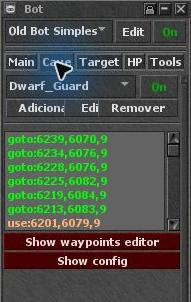
Open the bot and understand On / OffThe robot icon opens the panel. Opening or closing the window is different from enabling or disabling automation.
Step by step
- Click the robot icon at the end of the toolbar. The panel may open on the left.
- Check the configuration selector: Old Bot Simples or vBot_Tibinha. They organise features differently.
- The top On / Off is the master control. Individual features, CaveBot and TargetBot also have their own controls.
- Configure while stationary in a safe place. Enable one feature at a time and check that it behaves as expected.
- To stop automation, turn the master control off and check modules. Closing the panel with X only hides it.
Bot photographs on this page show Old Bot Simples. The vBot_Tibinha section below explains the other configuration’s controls.
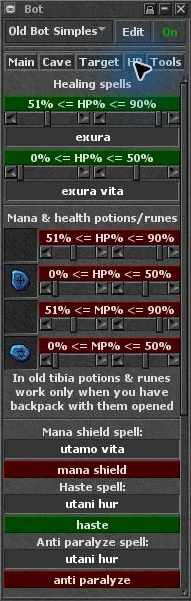
Back to search and chapters ↑Old Bot: configure healing and manaOn the HP tab, each range defines when to use a spell or item.
Step by step
- Open HP. Under Healing spells, enter a spell your character can cast.
- Set minimum and maximum HP%. Example: a heal at 51–90% and a stronger heal at 0–50%. Adjust to your health and hunting damage.
- Under Mana & health potions/runes, choose the correct item. HP% measures health; MP% measures mana.
- Enable each rule you want. Green indicates enabled and red disabled in the pictured panel.
- Keep the supply backpack open and test. If a rule does not trigger, check vocation, level, mana, item quantity and activation range.
Example ranges explain the controls; they are not a universal setup. Healing that starts too late may not keep up with incoming damage.
Back to search and chapters ↑Old Bot: haste, mana shield, food and equipmentThe lower HP tab contains effect and item maintenance.
Step by step
- Scroll HP to find Mana shield spell, Haste spell and Anti paralyze spell.
- Enter the correct spell before enabling it. It must exist for your vocation and have enough mana.
- Under Eatable items, select food and enable eat food to search for it in open containers.
- Check equipment rules further down. Select items and conditions before enabling automatic swaps.
Haste, anti-paralyze and mana shield can repeatedly consume mana depending on conditions. Monitor usage alongside healing and attacks.
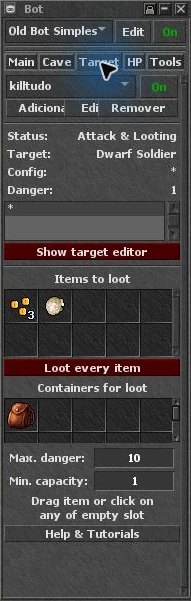
Back to search and chapters ↑Old Bot: create a target ruleTargetBot decides which creatures to attack and how to fight.
Step by step
- Open Target. Select or create a configuration and use Add to register a creature.
- Enter the exact name, for example Dwarf Guard. Use Edit to review an existing rule.
- Adjust Priority, Danger, Max distance and chase/distance controls for your vocation.
- Configure spells and runes after checking range, minimum mana and delay between uses.
- Save the rule, enable TargetBot and check Target and status during a short test.
Understand the controls
- Priority
- Helps select which rule/target takes precedence.
- Danger
- Danger weight used by the bot and combat limits.
- Chase / Keep Distance
- Chase or try to keep distance from a target.
- Attack / Group / Rune
- Single/group/rune attack options depend on the configured spell/item.
What happens if you enter * as a target?The asterisk is a name wildcard. It expands which creatures can match a rule.
Step by step
- Start with an exact creature name to understand the rule.
- Dwarf* can match names beginning with Dwarf. A standalone * matches broadly.
- When using a broad rule, review its priority alongside specific rules and watch the selected target.
- Do not treat * as a safe-creature list: the rule can include stronger enemies present in the hunt.
Old Bot: configure lootingTargetBot looting depends on item lists, containers and configured limits.
Step by step
- On Target, find Items to loot and add desired items.
- Under Containers for loot, select destination backpacks and keep them open.
- Check Loot every item: when enabled, it broadens collection beyond the selective list.
- Review Min. capacity and Max. danger. These limits can prevent looting when conditions exceed your settings.
If a corpse is not being looted, also check corpse access, space, capacity and TargetBot status.
Back to search and chapters ↑Old Bot: build a short routeCaveBot executes a sequence of map points and actions.
Step by step
- Open Cave and create or select a configuration. Leave CaveBot disabled while building your first route.
- Open Show waypoints editor. Add movement points using the editor controls and check list order.
- Start with a few points on a known path. Check X, Y and floor for each point.
- Add use actions where the route requires a door, stairs or another object. A movement point does not replace a required action.
- Save, place the character near the start and watch a complete loop. Fix sticking points before extending the route.
Understand the controls
- go to / goto
- Walks to a position.
- label / go to label
- Marks a section and allows jumping back to it.
- delay
- Waits before the next action.
- use / use with
- Uses an object or uses an item on a destination.
- say / function
- Sends configured text or runs an advanced Lua action.
Old Bot: Tools tab featuresEach tool has its own control and may repeat in-game actions.
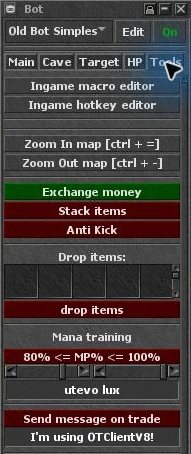
Step by step
- Open Tools and identify each tool before enabling it.
- Exchange money attempts to convert coin stacks; Stack items merges compatible stacks in open containers.
- Review Drop items carefully: listed items are dropped on the ground when enabled.
- Mana training casts the chosen spell in the configured MP range. Anti Kick repeats a turning action.
- Ingame macro editor and Ingame hotkey editor hold custom scripts. Saved content may execute through the bot; review it before use.
Send message on trade sends configured trade-channel messages when enabled. Check text and timing before using it.
Back to search and chapters ↑vBot_Tibinha: finding your way aroundThe advanced configuration combines modules with Setup/Edit buttons and their own profiles.
Step by step
- Choose vBot_Tibinha in the bot selector while preparing your setup. Switching changes loaded features; do it while stationary and check the master control.
- On Main, look for HealBot, AttackBot, Friend Healer, Alarms and EQ Manager. Use Setup/Edit to configure and each switch to enable.
- On Cave, configure paths, supplies and return actions. On Target, review creatures and looting.
- Tools contains utilities and container management. Enable only what you have configured and tested.
Understand the controls
- HealBot
- Healing/item rules with profiles and conditions.
- AttackBot
- Spell/rune rules, range, area patterns and attack conditions.
- Friend Healer
- Ally healing according to configured names, groups and conditions.
- Alarms
- Alerts for situations chosen in the editor.
- EQ Manager
- Equipment changes based on rules and conditions.
- Supplies
- Items and quantities used for supply checks.
vBot: HealBot step by stepDefine what to use, under which condition and in which order.
Step by step
- Open HealBot → Setup. Choose a healing profile and give it a useful name.
- Add the spell or item, HP/MP condition and mana cost when requested.
- Arrange rule priority. Avoid broad rules preventing the heal that needs to act first.
- Confirm changes, enable HealBot and test one condition at a time with supplies accessible.
HealBot’s 1–5 buttons select its internal profiles. These differ from the client feature profile and Hotkeys selectors.
Back to search and chapters ↑vBot: AttackBot and area attacksChoose the attack type and the conditions that allow its use.
Step by step
- Open AttackBot → Setup and select a category: targeted spell, area rune, targeted rune, empowerment or area spell.
- Configure spell words or item, range, mana cost/conditions and delay.
- For area attacks, check shape and required target count. Adjust the editor’s player-presence conditions.
- Save and test on a few creatures. Check that the spell suits your vocation and its area reaches the targets.
vBot: supplies, return routes and depotReturn controls depend on a route that knows how to refill and come back.
Step by step
- Open Supplies on Cave and configure items and limits used by checks.
- Build and test hunting, return, buying/depot and outbound sections. A supply list does not create routes on its own.
- Force Refill requests a return at the next supply check. Back & Stop requests a return and stop at the depositer action.
- To Trainers and Offline depend on matching route sections/labels. Without those actions, the button cannot find the destination on its own.
Test a full depot-and-hunt loop before relying on long routes. Purchases, deposits and quantities must be configured for your character.
Back to search and chapters ↑vBot: alarms, allies, equipment and containersThese modules solve specific tasks and need their own conditions.
Step by step
- In Alarms → Edit, choose situations to monitor. Also check bot volume in Options → Audio.
- In Friend Healer → Setup, review allies/groups, spells and health/mana limits before enabling.
- In EQ Manager → Setup, select equipment and conditions for each swap.
- In container tools, check items and destination backpacks. In drop functions, review everything that may be dropped on the ground.
Saving settings and changing characterEach selector has a purpose. Another character’s setup needs review.
Step by step
- Note which bot, client feature profile and Hotkeys configuration you use.
- Save editors and clearly name routes and rules. The client keeps bot storage by character/profile/version.
- When changing character, check spells, items, mana amount, capacity, equipment and vocation before enabling.
- Back up your setup before replacing or importing configurations. Do not use Reset All to fix just one rule.
Windows during your adventure
Some tools appear when talking to NPCs, using objects or taking part in an activity.
Buying and selling with NPCsThe trade window lists items accepted by the NPC and the transaction quantity.
Step by step
- Talk to the NPC and request trading when available.
- Choose Buy to purchase or Sell to sell. Select the item and adjust quantity.
- Check total price, money and capacity before confirming. NPCs do not all buy every item.
- Use the Encyclopedia to find a loot buyer. Read Server Log if a transaction cannot be completed.
Trading items with another playerThe trade window shows what each character is offering.
Step by step
- Use the item menu trade option and select the other character according to your control mode.
- Check both sides, item names and quantities. Inspect the offered objects before accepting.
- Accept when the offer is correct. If the offer changes, review its contents again.
Change outfit, colours and addonsAppearance can be customised with options unlocked for your character.
Step by step
- Open your character context menu and choose the outfit option.
- Choose an available outfit and check the preview. Use Head, Primary, Secondary and Detail for colours.
- Choose the addons available for that outfit. Owning an outfit does not mean every addon is unlocked.
- Confirm with OK to apply or Cancel to discard. For exploration outfits, see Hunt Atlas journeys.
Mining: smelting and craftingDwarven panels show recipes and requirements before consuming materials.
Step by step
- Access the smelter through the mine interaction. In Dwarven Smelter, choose the ore matching the desired bar.
- Check cost and available quantity. Smelt 1 attempts one bar; Smelt all attempts the bars possible with available materials.
- In Dwarven Smithy, select equipment or a pickaxe and review requirements, bars, bank gold and success/failure chance.
- Use Craft after reviewing the result and stated consumption. Consult the mining guide for recipes and locations.
Magic Forge, gems and upgradesEach forge has a purpose and shows operation requirements.
Step by step
- Access the appropriate forge in game and select compatible equipment.
- In Magic Forge, compare CURRENT and NEXT TIER and read materials, costs and possible outcomes shown in the window.
- In Gem Forge, check Gem, Equipment and Attribute to review the combination and chosen attribute.
- Review the confirmation before applying. Consult the dedicated guides for compatible items and upgrades.
Fishing: the bite barDuring a bite, the client shows a timing control to pull the fish.
Step by step
- Start fishing with the items and location required by the system.
- When the bite bar appears, watch the marker and target zone.
- Press Space or use Pull at the right moment. The window has a response limit; waiting too long can lose the bite.
- Check the game result and consult the guide for fishing equipment and rewards.
Solve common problems
Start with the game message and the feature settings.
The bot is On but does nothingCheck both the master control and each module’s controls.
Step by step
- Confirm you are online with the correct bot selected and master control on.
- Open the feature tab and check its switch. CaveBot and TargetBot may be off even when the master bot is On.
- Read conditions: HP/MP range, matching target, minimum creature count, mana, capacity and supplies.
- Check panel messages and Server Log. A script error differs from a condition that has not been met.
Healing or a potion does not workCommon causes are the item, condition, container or an unavailable spell.
Step by step
- Test the item or spell manually to confirm your character can use it.
- Check quantities and keep the item backpack open.
- Check whether the rule uses HP% or MP%, whether limits are ordered correctly and whether it is enabled.
- In vBot, check the active profile, priority and minimum mana. Read the server log for use restrictions.
The route is stuck or missed a pointCheck position, floor, obstacles and the action the route is trying to run.
Step by step
- Pause CaveBot and check the current point in the list.
- Compare the point’s floor/position with the actual location. Check doors, stairs, holes, keys and obstacles.
- Review use/use with actions and label names. Return to a known point to test the section.
- Test the full path after fixing it, including return and refill sections where present.
The game feels slow: FPS or ping?FPS measures visual smoothness; ping measures connection response time.
Step by step
- Enable Show frame rate in Graphics and Show connection ping in Interface.
- With low FPS, check frame cap, resolution, VSync and optimisation. Compare one change at a time.
- With high ping, check your connection and other network transfers. Raising FPS does not reduce ping.
- If the problem continues, tell support which build you opened, FPS, ping and the action that caused it.
A panel or backpack disappearedUsually the window was closed or opened in another side panel.
Step by step
- Click its icon to reopen the panel.
- Check both side panels and their scrollbars. A backpack may be below another window.
- In Options → Interface, check Left panels, Right panels and Container’s panel.
- If an action bar disappeared, check its option in Options → Custom and the selected profile.
Shortcuts to remember
- Ctrl+K
- Hotkeys
- Ctrl+B
- Battle
- Ctrl+P
- VIP List
- Ctrl+I
- Inventory
- Ctrl+J
- Encyclopedia
- Ctrl+Shift+Q
- Adventure Journal
- Ctrl+Shift+T
- Travel
- Ctrl+Shift+H
- My house
- Ctrl+Shift+F
- Fullscreen
- Ctrl+O
- Channel list
If you customised a combination or your layout behaves differently, use the feature icon and review your hotkeys.

Engine TFS Cn Soft | Terms of Service | Refund Policy | Privacy Policy